Showing posts with label GARMENTS PRODUCTION. Show all posts

Sunday, 11 October 2026

Garment Puckering: 4 Types, How to Identify Each, and How to Fix Them(A practical guide for sewing supervisors, quality teams, and industrial engineers)


        Puckering is a small defect that causes big headaches. A seam can look perfectly fine at the machine, then show ugly wrinkles after pressing, washing, or finishing. The result is rework, rejected lots, buyer complaints, and higher cost.

The key point is this: not every pucker has the same cause, so not every pucker should be fixed the same way. Before touching any machine setting, find out which type you are dealing with.

1. Tension Pucker: Is the Thread Pulling Too Hard?

        Over-tight thread tension is among the most common causes. When tension is too high, the thread draws the fabric together along the seam and creates a rippled look.

How to identify it

        Cut all the top and bottom stitches without disturbing the thread loops. If the pucker relaxes or disappears once the stitches are cut, tension is the likely culprit.

How to prevent it
  • Sew with the lowest tension that still forms a good stitch.
  • Set the feed timing for maximum pull-off.
  • Lower the bobbin tension by rewinding the bobbin with minimum tension.
  • Choose a thread with good lubrication.
Takeaway: Use only as much tension as the operation needs. A very tight stitch may look neat on the line, but the problem shows up later.

2. Inherent Pucker: When the Fabric Structure Is the Problem

        Sometimes the machine isn't the issue. The fabric itself can pucker because of structural jamming, where the yarns in the fabric are packed so tightly that the needle and thread have no room to pass without distorting the structure.

How to identify it

        Again, remove the stitching by cutting all top and bottom stitches. If the pucker disappears, structural jamming is the likely cause.

Possible solutions
  • Sew slightly on the bias, where the design allows.
  • Use a smaller needle.
  • Reduce stitch density.
  • Switch from lockstitch to chain stitch where appropriate.
  • Use a finer thread if possible.
Takeaway: Don't look at the machine alone. Look at how fabric, thread, needle, stitch, and construction interact.

3. Shrinkage Pucker: The Problem That Appears After Washing

        Have you seen a garment that looked perfect off the sewing line but puckered after washing or another treatment? That is likely shrinkage pucker. It happens when the fabric and the thread (or other components) shrink by different amounts, so the seam becomes unstable.

How to identify it
        Ask one simple question: does the pucker appear only after treatment or washing? If yes, investigate the shrinkage behavior of the fabric and thread.

How to control it
  • Use synthetic threads with low wet shrinkage.
  • Select compatible garment components.
  • Check how fabric, thread, and trims behave through washing and finishing.
        This matters most for garments that go through heavy wash or finishing processes. A garment must not only look good when it leaves the sewing line. It has to stay that way through every process that follows.

4. Feed Pucker: Is the Fabric Moving Through Evenly?

        Poorly controlled feeding is another frequent cause. The plies must travel through the machine in a balanced way. If one ply moves faster than the other, one layer ends up longer than its partner, and the seam puckers.

How to identify it
  1. Make two cuts across the seam, in the area where puckering is worst.
  1. Remove all the stitches between the two cuts.
  1. Compare the two plies. If one is longer, you have a feeding problem.
If there is a difference, check the feeding mechanism, machine settings, and operator technique.

Possible solutions
  • Use the minimum presser-foot pressure needed.
  • Check and correct the feed dog.
  • Improve the operator's handling technique.
  • Match the feed dog and presser foot.
  • Check the throat plate and presser-foot hole size.
  • Correct top and bottom feed timing.
  • Try a low-friction presser foot.
  • Use a needle-feed machine where suitable.
Correct feeding is especially important with difficult fabrics and multi-ply seams.

Quick Reference

        Don't Treat Every Pucker the Same Way
A common mistake is to start changing machine settings immediately, before knowing the real cause. A better routine is:

Observe → Test → Identify → Correct

    Watch where and when the pucker occurs. Run a simple test to see whether it relates to thread tension, fabric structure, shrinkage, or feeding. Then make the right correction. This beats random adjustments every time.
Think Beyond Final Inspection
Puckering should not be treated only as a final-inspection defect. By the time it is caught there, time, labor, and material are already sunk into the garment. Check for it at each stage:

Pre-production → First-piece approval → Machine setting → Line production → Washing/finishing

        Early detection lets you correct the process before a large quantity is affected. The goal is simple: don't inspect quality into the garment, build it into the sewing process.


The Bottom Line

        Puckering is not just a "sewing machine problem." It is shaped by thread tension, fabric structure, shrinkage, feeding, needle and thread choice, machine settings, and operator technique.
Identify the type first, find the cause, then apply the right fix. A few minutes spent finding the real cause can save hours of rework.


Pucker typeKey clueMain direction
TensionDisappears after cutting stitches            Reduce top/bobbin tension, better thread lubrication
InherentDisappears after cutting stitches                  Smaller needle/thread, lower stitch density, bias sewing
ShrinkageAppears after washing/treatment                  Low-shrinkage thread, compatible components
FeedOne ply longer after unpicking                 Fix feed, presser foot, timing, operator technique


Good sewing quality begins with understanding what is happening between the needle, thread, machine, and fabric.


Saturday, 10 October 2026

Line Balancing Tool Based on Operator Skill Matrix

 In a garment factory, when we see there is enough loading but production is not coming out from the line as per the input, we simply say there is a problem in line balancing. 

 From the top management to the worker everyone knows a better line balancing can improve line output – but many of them including engineers don’t know the right way of balancing a line when there is work pressure, employee absenteeism, low skilled worker etc. In this post, we will discuss about useful line balancing tools.

1. Funnel effect

If we imagine our production line like a tube, then each operation capacity must be close to a circle from the tube (picture 1). The radius of the circles must be similar to the radius of the tube, in order to be the line balanced. If the radius of the circles is different, our tube will become a funnel whit different forms, and the output will be the smallest circle (picture-2) of the funnel or any other form which our line will take it.


Sure, in order to balance the line, during the production, will be applied corrections like overtime and/ or supplementation of the workers from other production lines, … but all these actions will decrease real productivity and will increase the cost per minute.

2. Preparing of Production Lines activity equilibration

  • Prepare the Operation breakdown and define the correct SAM (SMV)
  • Measure operators’ efficiency, using, at least daily data collection ( better online data capture system)
  • Define the operators’ skills matrix (the efficiency of the operators in different operations and skills)
  • Define the Line Target using the above-presented formula, taking in consideration.

Operator skill matrix definition:

In the case of online data capture systems, the efficiency of the operators on different operations is given automatically. In the case of Daily data collection, skill matrix can be prepared in the SFC system using an algorithm. to make an average of the efficiency of the operator in different days when has worked a full day (or less 90- 80% from the day depending on system setup) on the analyzed operation or skill.

Types of Operator skill matrix

1. Efficiency on the operation code. Examples:

  • Operation 1: Sleeve bottom hemming using folder
  • Operation 2: Polo shirt bottom hemming before side seam, using folder
  • Operation 3: Sign front placket
  • Operation 4: Sign front pocket position

2. Efficiency on the operation skill: Skill 1: Bottom Hemming using folder and Sign 2: Sign

Define the Line Target taking into consideration the following

  1. The need for special machines – to not plan more persons on special machines than you have
  2. The 4 different efficiencies when is defined as the planning efficiency, used for target calculation.

Efficiency-1: Historical global achieved efficiency of the workers


Efficiency-2: Historical maximal efficiency of the workers (The average of maximum efficiency of the workers). This shows us what is the theoretically maximum achieved efficiency of the workers when
– The workers were planned to execute the operation where has the best skill and rhythm.
– The operators had loading all day
– When the operator had motivation


Efficiency-3: Line balancing efficiency. The resulted average planned efficiency of the workers using the under described Line balancing tool.


Efficiency-4: Realized efficiency. The average efficiency of the workers day by day after launching the current product in the line.

Important notes:

If the Line balancing efficiency is higher like the Planned efficiency, then for the same target you will need less No of workers, or with the same number of workers you must to define higher target (higher planned efficiency) if the remained worker can be integrated in Line balancing, without decreasing the efficiency of the planning.

If the Realized efficiency is lower than the planned efficiency, and if can’t grow up the operators’ efficiency with workplace optimization, training.., then:

  • Must be analyzed again with the under presented Line balancing interface the equilibration between operation and operators and in case to be redefined the Line target (Sure this will cause the delay of finish date)
  • Must to be planned overtime in different operations in order to keep the line balanced (Sure this will cause productivity decrease and costs increasing)
  • 3. Prepare the Line balancing sheet


  In the above presented Line balancing interface the work method is –

  1. Select the manufacturing order (operations and SAM) and the production line/ group (persons) where is planned to be executed
  2.  Set the correct target/day in the left up-side of the screen based on the formula and method presented before, defining the number of workers and the planned efficiency.
  3. Plan the target quantity from each operation for the correct operators, using the following instruments.

– Operation rating for persons. With a left click on “i” (information’s) button of the operation, the system will offer the rating of the persons in the database regarding the achieved efficiency on the selected operation and in the skill of the selected operation separately. The system also gives the same rating of the free (unselected) operators in the current balancing sheet.
– Person rating on different operations. Positioning the mouse on a person “i” button, the system will offer the rating of the efficiency of the person, from the system database, on different operators and skills separately.
– Person rating on the selected operation. Positioning the mouse in one point in the operation/ operator matrix the system will show the efficiency of the selected person on the selected operation and Skill.
– Allocate gradually more with 5 – 10% like the person’s efficiency on the current operation, especially for the persons under 100% efficiency, and follow and support those persons in order to increase the efficiency.

Line balancing methods:

1. Operation based – Plan first the difficult operations and all the target quantity
2. Person based – Plan first the persons in the possible higher eff. Operation
3. Combined – Plan first the difficult operations, but take in consideration if one person from the rating of the current operation has higher efficiency in other operation.
– Plan the person on other operation where has higher efficiency like on the current operation only if the operations have the same difficulty levels
– Plan the person on other operation where has higher efficiency like on the current operation even the operation with higher efficiency has a lower difficulty level

4. Implement and follow the Line balancing

Implement the rule in the line: INPUT = OUTPUT = TARGET

Do not input more.  Define the target of the line to avoid the “funnel effect”.

Assure the loading in critical points using one of the methods:

  • Implement strategic inline stock before key points
  • Use Jokers, which are not allocated in line balancing sheet, but are taken into consideration in the Target calculation formula!

Sure, the best situation is when you have enough multi-skilled operators to not need to invest in one of the presented solutions to avoid having an unbalanced line and productivity decreasing because of absenteeism, inline quality problems, efficiency variations …


Use a similar sheet, like under presented (based on line balancing sheet) to follow, at least the critical points, min 2 times/ day (preferably each 2/3 hours).

In the above sheet, the “Plan” columns are based on Line balancing sheet, and the “Real” columns will be completed manually (if is no online data capture) during the day, in order to be visible the line balancing problem at one it appears.

Hope you find this post useful.

About the Author: This article is written by Marthi Bela. He is an ERP, PMTS specialist and Garment Industry expert.


Thursday, 8 October 2026

RFID System for Production Tracking in Apparel Manufacturing

 For real-time shop floor production tracking and production monitoring in apparel manufacturing, RFID technology is one of the commonly used systems. In this post, I have shared a production tracking system used in a garment factory for real-time production monitoring. RFID stands for Radio Frequency Identification.

I don’t need to mention that we all like faster product delivery and quick response to the market. We use many mobile applications in our smart mobiles for managing our personal life. When the apparel industry going for smart manufacturing, machine learning, using IoT, AI tools, apparel manufacturers feel the importance of data for managing their production floor – Why we can’t have a real-time production tracking system for the production floor to manage the production in a better way?

When you do manual production tracking, you count garment production hourly or bi-hourly. You count production from the end-of-line output. You count sewing operators and helpers in a line. You update production quantity on the Hourly Production board. You get the production status of the whole factory after one day. That is too late for decision making and fixing production problems. What if you get the production update after each garment is stitched and completed in each workstation?

Let me explain what we mean by production tracking in a garment factory. Production tracking means more than only counting pieces at the output operation and operator head counting. Getting production counting from each workstation (operation-wise as well as operator wise production data), knowing how operators spend the given time when they are on the shop floor.

Purpose of the RFID system for apparel

The primary objective of an RFID based real-time production tracking system is capturing real-time data and viewing the report in real-time.

Improving process visibility and transparency. Accuracy in production data.

Data capturing and getting data automatically through scanning RFID tags in the workstation. Once you have captured data from the desired activity in the pre-defined parameters, you can play with the data and build reports and KPIs as you need.

I have seen a couple of  real-time production tracking systems that are helpful for production tracking and production floor monitoring. I will be referring Blue cherry Shop floor control system for explaining the RFID system, the workflow of this system.

RFID System Workflow in garment manufacturing.

There are many technical terms and data designed based on capturing data and storing data in different database tables to retrieve the report for various purposes. I am not going to bore you by explaining technical things here. Instead, I will show how this system works and what kind of information you need to enter into the system before you can scan the RFID tags.

You need to install the operator’s device (called as sewing operator terminal) at the workstation. Connect the device through wiring and networking cable. It can be a wireless device. Installation of the device is decided according to how you want to capture production data and workflow of garment components in a production line. I mean, you can install a separate terminal for each employee, you can install one terminal for a group of employees who are doing the same operation in the same place. And the group is working on the same bundle.

After installing all the hardware components, you need to set up data in the system.

Create a master for employees, line and sections. Add plant details, work shift detail.

Add masters for jobs – you need to create a database for a list of tasks (operations) you do for making your apparel products. You have a code number for each job (sewing and non-sewing activities in the manufacturing related to processing style).

Add operations and style – for a new style you need to create operation adding operation SAM, sequencing of operations in a style, connecting the style with a production line. Marking operations will be the starting point of the style and components. This is like an OB you make in an Excel sheet.

Entering data for order, lay and bundle listing – In practice, apparel manufacturers lay the fabric on the cutting table and cut the fabric as per marker plan. In a lay, you cut multiple layers of fabric plies and multiple markers. You maintain the record of orders – number of lays for completing whole order – size-wise and color-wise cut quantity in each marker. Finally cutting department makes bundles with few garment pieces (10-20 pieces per bundle).

In the production line, operators get bundles and the work on it and move the completed bundle to the next operator. In the database you need to create bundles – maintaining the same order of data hierarchy – one Order – multiple lays (cut) in one order – multiple bundles (size and color wise) in one lay – a few garments in each bundle. Combined bundle quantity should be the total order qty.

Assignment of RFID tag against each bundle – after making the list of bundles, you need to assign an RFID tag for each bundle. You can make more than one bundle tag for a bundle. By making multiple tags for the same bundle, operators can work on the same bundle parallelly. For the identification of bundle (style, order number, garment color size), the label is attached to each bundle. 

Attaching tags to bundle – You attach a tag to each bundle before loading it to the employee. The RFID tag can be attached to a bundle in the cutting section or you can attach to the bundle in the feeding area. Here I would like to add bundle /piece can be loaded in various ways in the line.

  • moving bundle throughout the line
  • moving a single piece throughout the line
  • feeding bundle in preparatory section but move a single piece in the assembly section
  • loading bundle to all operation but want to count pieces one by one
  • loading different bundle components at different places at the same time – parallel loading.

All these kind of bundle movements can be adopted by RFID tags assignment and operator terminal profile.

Operator terminal – Set up operator terminal with the operation code and make ready for scanning tags. Operators login to the system by entering their employee code into their terminals. Once they login to a terminal, all kinds of transactions processed into the terminal, are recorded against the employee.

Scanning RFID tag for production counting – Before an operator starts working on a bundle, they scan RFID to the sewing terminal. Once garment bundles reach to the operators, they scan the RFID tag to their terminal. System capture all the transactions performed at the operator’s device. The system captures their transaction and bundle qty as production quantity.


Other kinds of transactions – Other than scanning bundle tags there many other different transaction operators can do as per there need and data required by the factory. Like, the operator can split the bundle, they can log-out from one workstation and work another workstation by login to another terminal. If they work multiple operations, they can change the operation in the terminal. In case an operator gets the whole lay and do the continuous work, scanning of individual bundles can be avoided, by using bulk operation function.

The operator sees their production, earning and performance in the terminal. The operator can send an off-standard request to line supervisor by entering off-standard code in her terminal. A supervisor can approve the off-standard code required on the terminal or from the computer 

The basic requirement for installing an RFID system

  • You need hardware and software for installing the RFID system. The software and hardware are normally supplied by the supplier. Other than these components, you need the following
  • IT Team – IT team needed for networking, server maintenance. 
  • Computer, Server, internet (intranet), printer and database
  • Industrial engineer for Data preparation and report viewing. In the system, you need to enter style data with operation SAM. You know, only an industrial engineer can establish garment SAM and operation SAM. In a factory, IE is responsible for operation SAM. Sequencing of the sewing operations in style also needed. Without an IE team, installation of the RFID system, would not be possible.
  • Training of sewing operators – Sewing operators need to be trained on how to use the terminal. Supervisor and line leader need to be trained for basic troubleshooting on the floor.

Benefits of RFID System in production tracking

When you have an RFID based real-time production tracking system, you will have a database. You have the flexibility of making reports in many ways as you want. Factories that have a strong IT team and having knowledge of programming and making a report from SQL database, can easily make a useful report for the management and factory. Customized production reports can be made in Crystal report, Excel-based reports using SQL queries.

With this system, the data recorder and line supervisor cannot give you inaccurate production data. As operators get an RFID tag for the garment she stitched. 
Manual data collection and report making can be eliminated by installing a real-time production tracking system. All production data, lost time data and quality data will be captured from the operator’s device and the system will process those data and report will be made automatically in the pre-fined report templates.

Improved visibility and transparency. You can view production data from a remotely having internet connection. Managers can review data for all sections and lines. They can compare performance between the line. Can track order status, WIP.

Some of the common reports factories views include

  • Hourly production report
  • Line wise employee attendance and absenteeism
  • Previous day’s employee wise production, operation wise production
  • Today’s line efficiency and previous day’s line efficiency
  • WIP report
  • Individual operator’s efficiency and skill history

With the real-time production tracking system, you can introduce an incentive scheme for sewing operators. You know the incentive scheme is the main driving force for productivity improvement in the shop floor. For designing an incentive scheme, you need production and efficiency for individual employees. With the real-time production tracking system, you will have all the basic data you need for an incentive scheme and calculating the employees’ bonus amount. Operator incentives can be designed in various ways – like individual performance, group performance, a combination of group and individual performance.

You can eliminate the bar-code system on the production floor, in case you are already having such a system.

Your operators don’t need to writing production quantity in a piece of paper.

You can integrate other modules in the production tracking systems – like real-time Quality control system, machine maintenance module.

RFID tags are reused until the tag get damaged. Even one tag can be used for more than 10 years. So, no expenses in RFID tag.

A time-saving tool for industrial engineers. In a garment factory, IEs spend a lot of time in daily report preparation and data analysis. Data preparation can be eliminated by introducing the RFID system.

Improving productivity – All applications and software commit that it will increase the factory’s productivity. But how? A system can only provide data – you need to take action to get the benefit

Lost-time data – by capturing lost time data, you can find major reasons for efficiency losses in production. After getting lost-time data, if you act and reduce lost-time, your productivity will improve.

Limitations and challenges of an RFID system in apparel

I am implementing the RFID based real-time production tracking system for 8 years. I did the implementation in many garment factories covering 5 different countries. I have worked with the shop floor team, IT team and engineers. I will share some of the challenges that factories faced.

Each factory is unique, and different garment factories view daily production reports in different formats. The inbuilt reports in a real-time production tracking system are limited. In case the factory wants additional report matching with their existing excel reports, suppliers can develop the customized report with/without additional charges.

The involvement of the line supervisors, line leaders and sewing operators is essential for a successful implementation. Sometimes questions come – why operators should spend time on scanning RFID and follow the new system if they are getting any benefits from this system (in the salaried environment).

I have seen real-time production tracking systems is used as standalone software and not integrated with the ERP and payroll systems. Engineers become the lead for the system installation and maintaining the system. When an IE leaves the factory, factory face issues in maintaining the system.

During the implementations, factories develop many custom reports. But after a few months, they used to view and track only a few reports.

Most of the factories I had worked with do not have a database team (IT team having knowledge of SQL DB and report preparation from SQL database) for developing reports internally. In such a situation, factories can’t utilize the data they captured. 

Conclusion

I understand it is not possible to understand and visualize the whole process of the RFID system and its use in a garment unit by reading this short article. I have explained only major activities with brief notes and without any example. My objective of sharing this piece of article is to make you aware of how the RFID system works in an apparel manufacturing unit.

The technical things and actual working method can be learned when you install such a system in your factory. There are a few companies who provide real-time production tracking solutions, most of them use RFID technology for data capturing. The working method and data preparation may vary from one product to another.

For tracking the real-time shop floor production data, RFID systems are good options for the garment factories. The benefits of this system are enormous if you can fully utilize the product.

Written By: 

Prasanta Sarkar

Textile engineer and a postgraduate in fashion technology from NIFT, New Delhi, India. 

Thursday, 24 March 2022

Way to get Maximum Efficiency in Shorter Run Orders at Garments Sewing Line.

An order of small order quantity that runs on the production line for 3-5 days called Shorter Run Orders. The order quantity for a short-run order may be different depending on the style design. Garment factories set their own criteria for considering the order short-run or a long-run order.

It is true that for short-run orders when the line reaches its pick performance, stitching get completed. When a factory compares the line performance of a short-run against a long-run order, it gets less efficiency. Normally, on the first 1-5 days of production loading, a line gradually increased its performance day by day (learning curve) and line works at optimum efficiency level after the learning curve. If the line gets a long run order, that normally runs more than half a month, the average efficiency of the order comes higher as after learning most of the days, the line works on the higher level.

On the other hand, when an order gets finished by 4th to 5th day of loading, the average line efficiency remains low due to initial days' learning curve. When a line gets 4-5 short run orders in months, they lost the productive time on production line set-up (style changeover). This results in lower line performance during the month.


Tips that can be useful in achieving maximum efficiency in shorter run orders. Though these tips are applicable for long-run orders too to achieve better performance.

  • Prepare the line layout and process workflow on paper in advance and follow that one during line set-up.
  • By loading the new style back to back. This means when the previous style getting completed from the one operator, load the new style without waiting for completing style from all operations. 
  • All you need to be better prepared. Keep continuous feeding to the line. Before loading the cuttings in the line, keep everything ready- all approvals related to the style, trim, and complete cutting of the order or at least two day's cutting WIP should be there.
  • Train employees (sewing operators) separately, how to do the operation they are going to assign to the style.
  • Supervisors need to be prepared and need to complete line set-up as quickly as possible (no waiting of operators should be there), including machine changing, an instruction to operators, quality specification, approval etc,
  • Reduce bundle size. single piece flow would better for small runs.
  • If possible use a shorter sewing line for small qty orders. This change will also make difference in achieving line's overall efficiency.

Collected by: Md. Tarikul Islam Jony
Mail:jonytex073@gmail.com
+8801912885383


Saturday, 26 June 2021

Stitch Classification - Various Types Stitches Used in Garment Making

 In textiles, a stitch is a series of repetitive single turn or loop of threads or yarns through interloping, intra-looping, or interlacing. It is the fundamental element for sewing, knitting, embroidery, crochet, and needle lace-making whether by hand or machine. It can be formed by any of the following three methods:

  • Interloping: It is formed by passing the loop of one thread through the loop of another sewing thread. E.g. Stitch type 401
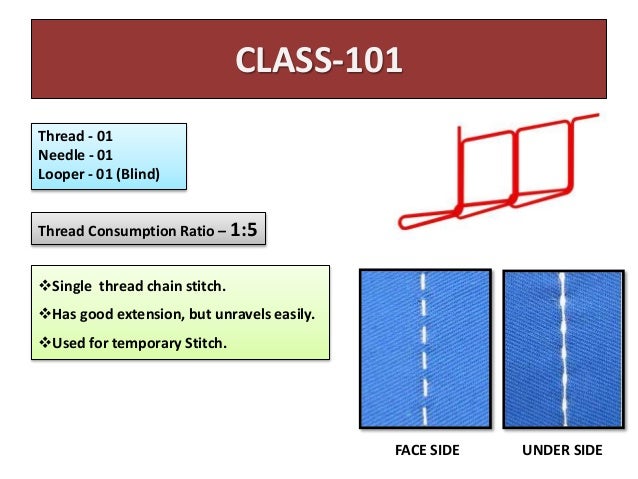
  • Intra-looping: It is formed by passing the loop of one thread through the loop of the same thread. E.g. Stitch type 101
  • Interlacing: It is formed when one thread passes over another thread. E.g. Stitch type 301
Based on this, there are more than 70 types of stitches out of which around 18-20 types are used most frequently and for ease of identification all the types have been grouped to 6 classes based on the number of the needle, direction of sewing, the form or shape of the stitch, purpose of the stitch, etc. The 6 classes of stitch are mentioned as: 

1. Class 100: Single Thread Chain stitch

The stitches formed here are from one or more needle by the method of intralooping. Thus, one or more loops of the needle thread are passed through the fabric and secured by looping with the next loop of the same thread after they are passed through the fabric. This type of stitch is very insecure as each loop is dependent on the next loop and a single thread breakage can pull apart the entire stitch.

These look similar to that of lock stitch on the face side with the loops on the back. The added advantage of these loops is that it makes the stitch elastic and thus can be used where the fabric needs a little stretch such as in back neck tape in t-shirts. Also, with easy removal of stitch, it is used in basting operations in tailor-made garments. This kind of stitch is often not preferred for seaming operations but is widely used in multi-needle machines, as temporary stitch and blind stitch. 

Stitch type 101 or single needle chain stitch is the most common of them along with a 103 single thread blind stitch. The front and back of all the other types are given below 
STITCH TYPE & THREAD CONSUMPTION 

2. Class 200: Hand Stitch

These types of stitches are hand stitches that are used for decorative purposes. These are formed by a single sewing thread and the stitch is held by a single line of thread passing from one side to the other side of the fabric. This is mostly used for casual fitting with a simple sewing needle and thread as domestic needs but is also found as topstitch in high-priced garment due to its perfect finish. This can also be done on automatic machines called pick stitch sewing machines but are very slow and are rarely in use. The front and back of all the other types are given below.  
Basic Textile : Features of Stitch class 200 , its Types , Advantage &  Disadvantage and Uses 


3. Class 300: Lock Stitch

Lock stitch is the most common form of stitch in ready-made garments and is formed when the thread or threads are introduced from one side of the material to interlace with thread or threads introduced from the other side of the material. The top thread is called the needle thread and the bottom thread is called the bobbin thread. The interlacing of the threads makes the stitch secure and difficult to unravel makes it the most appropriate for a wide range of seams. Also, lockstitch has adequate strength for most purposes with a correct combination of thread and fabric.
 
The main disadvantages of lock stitch are
  • Limited bobbin thread length makes it necessary for changing of the bobbin from when it gets finished.
  • Multi-needle stitching with many closed space needles is not possible due to limited space for bobbin. So, at most two needles can be used in a lock stitch machine.
  • The interlacing of thread limits the elasticity of the stitch and is unsuitable for edge neatening.
  • It is not suitable for knitted fabric due to lack in elasticity.
Stitch type 301 is the most common type of stitch with uses in joining garment components, top stitching, etc. Also, buttonholing, button attaching, blind stitching falls in this class of stitches. The front and back of all the other types are given below.  
Lockstitch - Wikipedia 


4.Class 400: Multi-thread Chain Stitch

It is a multi-thread chain stitch type where loops formed in one set of sewing thread is passed through the fabric and are held by interloping and interlacing with loops formed by another set of threads called the looper threads. It looks like that of a lock stitch on the front side of the fabric but has a double chain effect created by the looper thread on the backside. Compares to lock stitch, a 2-thread chain stitch is much stronger and since no threads are interlocking with each other within the fabric there are lesser chances of having a puckering in the seam. Another advantage of this is that both the needle and looper thread runs from large cones on the top of the machine unlike that of the limited sewing thread inside bobbin. Also, it runs much faster than that of a lock stitch machine at 8000rpm. 
Stitch type 401 is the most common of them all and is used in sewing jeans and trousers and is also used with over lock as a safety stitch. Stitch type 406,407 are used for joining lace, braid, elastics with the garment. The front and back of all the other types are given below.  
                           This is a 401 chain stitch located on the outside seam of a pair of jeans.  This stitch has a high speed of production, and is more ext… | Chain  stitch, Stitch, Seam 

5. Class 500: Over-edge Chain Stitch

It is mostly known as overlock stitch and is formed by one or more sets of sewing threads with at least one set of thread going around the raw fabric edge. All the stitch in this class has high elasticity which does not unravel on thread breakage. Also, the machines are equipped with a trimming knife to make the edge neat before sewing. The width of the stitch may vary from 3-5mm. Overlock stitches are classified according to the number of threads used for sewing such as 1,2,3,4 or 5 thread stitches. Each of these stitches is different in appearance and their respective benefits are:
  • 1 thread overlock stitches are used for butt-seaming.
  • 2 -3 thread overlock stitches are used as edge neating seam in woven and knitted garments.
  • 4 thread overlock stitch also known as mock safety stitch provide extra strength while retaining flexibility.
  • 5 thread stitch has two needle threads known as safety stitch which forms stronger seam.
Also, the speed of the overlock machine is similar to that of chain stitch machines and can go up to 8000rpm. Stitch Class 504(3 thread overlock) is the most common of all and is used for securing the raw edges of the fabric and for heavy fabric such as denim 514 (4-thread mock safety) is used. This is because 3-thread stitches are prone to seam grinning when the seam is pulled at a right angle to the seam. The front and back of all the other types are given below. Class-500 (Over Edge Stitch) | Types of stitches, Stitch, Edge stitch 
 

6. Class 600: Covering Chain Stitch

It is mostly known as Flat lock stitch and is formed by three sets of sewing thread namely, needle, looper, and spreader. Apart from the needle threads, the other two sets cover the top and bottom part of the stitch. It is the most complicated of all types with up to a total of nine threads including four needles and rest looper and spreader thread. 

These are mostly used for attaching tape, lace, braid, elastic to the knit fabric, etc. It can also be used as a decorative stitch. Stitch type 602 is mostly used for the above functions and hemming in t-shirts. The front and back of the rest are given below.  
Stich n sesm types with description 
 
 
Stitch classification may not be of so much importance when it comes to knowledge but a clear understanding of it is very much important when there is a requirement of identification of stitching to be done in the garment especially in the tech pack. The stitch type then acts as a code at letting the reader know what stitch has to be done over that part of the garment.    


Collected by: Md. Tarikul Islam Jony
Mail:jonytex073@gmail.com
+8801912885383


Tuesday, 5 November 2019

Does Worker Happiness Lead to Improved Work Performance?

Background:

      Through decade long process improvement & consulting experience, I will say one of the commonly seen major problem of apparel manufacturing industries are worker turnover, absenteeism and their low involvement in process improvement, which gets converted into low productivity, poor quality, increase in wastages and low profitability. This entire problem has a direct relation with worker happiness. 
Global companies like Google, Amazon and many other most successful companies growth and innovation comes from their happy and dedicated employees. These companies have taken serious initiative for improving employee happiness.
Many people would argue, “these are big MNC companies and they have deep pockets and resources” although the argument is more of a myth than a truth. Let us understand how even a small and medium size apparel manufacturing company can even get benefit from - “Worker Happiness Index”.

How to Measure and Analyse Worker Happiness Index?


There are various ways and means to measure the happiness index although it depends on company, to what sophistication level they want to measure and analyze the happiness index.
  • Data recording for happiness index:

    1. A well-designed check-sheet format could be used for capturing each worker happiness or grievances.
    2. There could be simpler ways to capture worker’s happiness. For initial identification, organisation could place two baskets named happy and unhappy and each worker could be given similar ball to put in basket. This would help organization to understand quickly percentage of unhappy workers. Incase of high percentage of unhappy workers, in-depth data collection could be initiated in future.
  • Understanding situation better through data analysis and various graph, charts:

    1. Department wise happiness and unhappiness percentage should be captured every month. 
    2. Reason for unhappiness / grievances category should be analyzed through pareto chart. 
    3. To get the company wide complete picture of worker grievances Radar chart can be used for quick understanding.
  • Improve worker happiness through problem solving & implementing simple and innovative solutions:

    1. Once data collection and analysis is done, there are various tools for root cause analysis like: Fish bone diagram, 5 why analysis & Brainstorming etc.
    2. It is very important to select simple and effective solutions which can bring happiness to the worker and employees.
    3. It is very important to continue with worker happiness data capturing, even after it improves.

Benefits:

              Following benefits can be achieved through improved worker happiness:
  • Reduction in worker migration
  • Reduced absenteeism
  • Reduction in excessive overtime
  • Reducing the chances of ’worker unrest’ or ’worker strike’
  • Increased work efficiency through higher output per person
  • Improved quality through well trained happy worker instead of newly joined worker due to higher attrition
  • Whole hearted participation in improvement projects which brings financial savings for management

Conclusion:

                  Most of us assume worker/ employee happiness can only come with increased salary, bonus or incentive. Well, they are important but many times it can be improved with simple steps, I have experience where a worker morale & happiness was improved through:
  • Improving workplace hygiene, washroom cleanness
  • Easy approval for ‘taking flexible holidays’
  • Regular acknowledgement of better performance
  • Initiating or Improving canteen facility, child care room, medical facility
  • Eliminating misconduct with worker
  • Regular worker training & motivation
Many times small changes can even bring happiness to the majority of workers. Improved worker & employee happiness not only improves the performance and profitability it also creates the momentum, which takes the company to the path of business excellence.
Published By: Manoj Singh
 Manoj Singh has wide experience of over 12 years in garment industry in
India and abroad. He has done consulting for over 7.5 years and his services has benefited above 70 factories in India, Bangladesh, Sri Lanka, Myanmar & Dubai. He has actively worked with Factories, Brands, and International funding agencies, Garment Clusters, Boards & Councils and other consulting firms.